|
Home | Search | The Artists | Teaching | Hiring | About This Site | Contact Us |
|||||||||||||

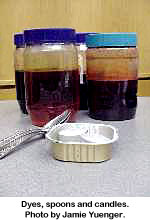
Ukrainian Eggs “How does she do that?” Have you ever seen something and wondered how it was made? Here’s a step-by-step look at how Betty did her amazing art! These are Betty’s basic tools:
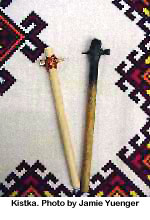
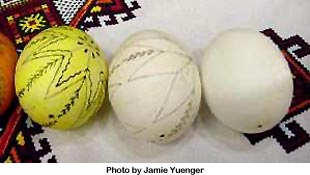
Betty started by blowing out the yolk and white from the egg. See the tiny holes at the bottom of the eggs above? Then she would draw a design on the egg. First she drew lines dividing the egg into sections—one line around the middle of the egg and another line from the “top” of the egg to the “bottom.” Then she drew a basic design, like on the middle egg above. Next, Betty would use beeswax to cover whatever part of the egg she wants to stay white. The beeswax seals that part of the egg and the dye cannot get to it. How does she get beeswax on the egg? With a kistka!
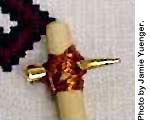
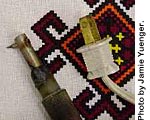
A kistka is a stick, about the size of a pencil, that has a small funnel on one end. Betty would put little chunks of beeswax in the bigger part and then hold the kistka over the candle to melt the beeswax. The melted wax comes out the smaller pointy end. A traditional kistka is made of wood and brass, but there are other types too, including electric ones.
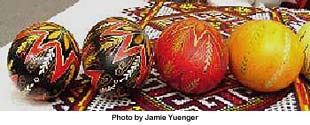
After Betty wrote on the egg with the melted beeswax, she dyed the egg yellow. Then she applied more beeswax to cover whatever part of the egg that she wanted to stay yellow. Then she dipped the egg into the orange dye and when it was dry, she put wax on the parts of the egg that she wanted to stay orange. Betty repeated this process, dipping the egg next in red and last in black.
|
For Educators: |
||||||||||||
|
“But the pysanky to me is done with your heart— your heart and your feelings— and who you are and what you are.” – Betty Pisio |
|||||||||||||
|
Home | Search | The Artists | Teaching | Hiring | About This Site | Contact Us |
|||||||||||||

 Betty’s next step
was to take the wax off the egg. The only way to get the wax off is
to heat it. Betty would hold the egg over a candle and carefully wiped off the wax as it
Betty’s next step
was to take the wax off the egg. The only way to get the wax off is
to heat it. Betty would hold the egg over a candle and carefully wiped off the wax as it